At the start of my own Arduino based Quad Drone project at home, I was looking for the best way to communicate between my remote and my Arduino based drone. In one of my earlier posts I gave a short description about using the PS3 SixAxis controller instead of a RC Remote, and this is also the plan for my Quad.
To be able to easy support and integrate functionality on a later stage of development, I was looking around the web for solutions on this type of communication. and there it was: MAVLink (Micro Air Vehicle Communication Protocol).
MAVlink is a light weight message marshaling library first developed back in 2009 by Lorenz Meier for use in micro air vehicles.
MAVLink has a set of predefined messages and structures for use between a “ground station” and the air vehicle. There are a few pre-generated data sets and message structures to be used, or it is possible to make your own by modifying or generating a set of XML files in the library. A description on how this can be done is found here, or more Arduino specific here.
Generate MAVLink Headers
To get started with the integration of MAVLink, you first need to get the correct .h (Header) files to use. There are some predefined headers generated from the last stable release on GitHub for direct download and ease of use.
I wanted to use my own set of supported messages, so I decided to use the MAVLink Generator to be able to make my own set of supported messages. For simplicity I will be using the same example as posted on the MAVLink homepage, integrating the HeartBeat message, but under my own MAVLink protocol alias JAF_QuadProject.
MAVLink XMLs
First of all there is no code to be written when to want to generate new messages, just .xml files that are used by the mavgenerate.py python script provided by the MAVLink repository. Details on this can be found here.
There is a .xml file allready created in the MVLink project that supports only the HeartBeat functionality. This is called minimal.xml. Copying the contents of minimal.xml into JAF_QuadProject.xml I have made the necessary preparations to get started.
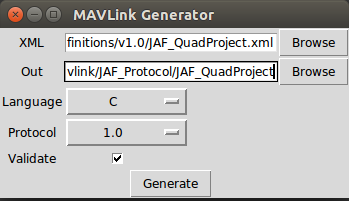
After running mavgenerate.py directly from the project root folder i get a GUI with simple options.

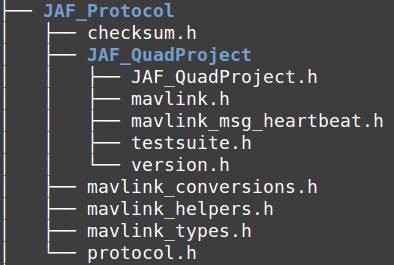
This generator will create the necessary .h files for using MAVLink on the Arduino

Integrate MAVLink on Arduino
To actual be able to use MAVLink on the Arduino, you need to provide two .h files yourself. I wanted to use the supported MAVLINK_USE_CONVENIENCE_FUNCTIONS for easy later usage of any message type that will be supported. Usage is defined here.
mavlink_bridge_header.h
When using the Convenience Functions you need to create the following file in your project:
- mavlink_bridge_header.h
This header file will provide the necessary function description that the system needs to actually use the Convenience Functions generated MAVLink code
/* MAVLink adapter header \*/
#ifndef YOUR_MAVLINK_BRIDGE_HEADER_H
#define YOUR_MAVLINK_BRIDGE_HEADER_H

#define MAVLINK_USE_CONVENIENCE_FUNCTIONS

#include "mavlink\mavlink_types.h"

/* Struct that stores the communication settings of this system.
you can also define / alter these settings elsewhere, as long
as they're included BEFORE mavlink.h.
So you can set the

mavlink_system.sysid = 66; // System ID, 1-255
mavlink_system.compid = 44; // Component/Subsystem ID, 1-255

Lines also in your main.c, e.g. by reading these parameter from EEPROM.
\*/
mavlink_system_t mavlink_system = {66, 44};

\/**
\* @brief Send one char (uint8_t) over a comm channel
\*
\* @param chan MAVLink channel to use, usually MAVLINK_COMM_0 = UART0
\* @param ch Character to send
\*/
static inline void comm_send_ch(mavlink_channel_t chan, uint8_t ch)
{
	if (chan == MAVLINK_COMM_0)
	{
		Serial.write(ch);
	}
	if (chan == MAVLINK_COMM_1)
	{
		Serial1.write(ch);
	}

#if DEBUG
	Serial.print(ch);
#endif
}

#endif /* YOUR_MAVLINK_BRIDGE_HEADER_H \*/
Note:
This method will provide information on wich channel, or Serial resource to use on the Arduino.
MAVLINK_COMM_X are only internal communication definitions used inside MAVLink libraries to detach from the Hardware layer of the application.
the mavlink_bridge_header.h needs to be imported before mavlink.h, because mavlink.h uses the mavlink_system_t mavlink_system definition set in this file.
In this example the system is started with systemid 66 and componentid 44
mavlink_receive.h
To be able to receive MAVLink formated messages you need to provide a header file with the definitions on the hardware receive channels used in the application.
For the Arduino create this file:
- mavlink_receive.h
This header file will provide the handler for receiving and parsing MAVLink messages, before deciding on the action to take.
// mavlink_receive.h

#ifndef _MAVLINK_RECEIVE_h
#define _MAVLINK_RECEIVE_h

#include "mavlink\JAF_QuadProject\mavlink.h"

// Example variable, by declaring them static they're persistent
// and will thus track the system state
static int packet_drops = 0;
static int mode = MAV_STATE_UNINIT; /* Defined in mavlink_types.h, which is included by mavlink.h */

\/**
\* @brief Receive communication packets and handle them
\*
\* This function decodes packets on the protocol level and also handles
\* their value by calling the appropriate functions.
\*/
static void communication_receive(void)
{
	mavlink_message_t msg;
	mavlink_status_t status;

	// COMMUNICATION THROUGH EXTERNAL UART PORT (XBee serial)

	while (Serial.available())
	{
		uint8_t c = Serial.read();
		// Try to get a new message
		if (mavlink_parse_char(MAVLINK_COMM_0, c, &msg, &status)) {
			// Handle message

			switch (msg.msgid)
			{
			case MAVLINK_MSG_ID_HEARTBEAT:
			{
											 // E.g. read GCS heartbeat and go into
											 // comm lost mode if timer times out
			}
				break;
			default:
				//Do nothing
				break;
			}
		}

		// And get the next one
	}

	// Update global packet drops counter
	packet_drops += status.packet_rx_drop_count;

	// COMMUNICATION THROUGH SECOND UART

	while (Serial1.available())
	{
		uint8_t c = Serial1.read();
		// Try to get a new message
		if (mavlink_parse_char(MAVLINK_COMM_1, c, &msg, &status))
		{
			// Handle message the same way like in for UART0
			// you can also consider to write a handle function like
			// handle_mavlink(mavlink_channel_t chan, mavlink_message_t* msg)
			// Which handles the messages for both or more UARTS
		}

		// And get the next one
	}

	// Update global packet drops counter
	packet_drops += status.packet_rx_drop_count;
}
#endif
A working example
To make sure the system is working I wrote a small test program for the arduino:
/*
Name:		JAF_MavLink.ino
Created:	12/23/2015 22:30:32 PM
Author:	JohnF
Editor:	http://www.visualmicro.com
\*/


#if defined(ARDUINO) && ARDUINO >= 100
#include "arduino.h"
#else
#include "WProgram.h"
#endif

#define DEBUG 1

#include "mavlink_bridge_header.h"
#include "mavlink_receive.h"

MAV_AUTOPILOT mav_autopilot;
MAV_TYPE mav_type;
MAV_MODE_FLAG mav_mode_flag;
MAV_MODE_FLAG_DECODE_POSITION mav_mode_decode_position;
MAV_STATE mav_state;

void setup()
{

	/* add setup code here \*/

	Serial.begin(57600);
	Serial1.begin(57600);

	mav_autopilot = MAV_AUTOPILOT_INVALID;
	mav_type = MAV_TYPE_QUADROTOR;
	mav_mode_flag = MAV_MODE_FLAG_MANUAL_INPUT_ENABLED;
	mav_state = MAV_STATE_CALIBRATING;
}

void loop()
{

	/* add main program code here \*/

	_MAVLINK_RECEIVE_h communication_receive();

	delay(500);

#if DEBUG
	Serial.print("\n");
	mavlink_msg_heartbeat_send(MAVLINK_COMM_2, mav_type, mav_autopilot, mav_mode_flag, 0, mav_state);
#else
	mavlink_msg_heartbeat_send(MAVLINK_COMM_0, mav_type, mav_autopilot, mav_mode_flag, 0, mav_state);
#endif
The MAVLINK_COMM_2 channel used above is not implemented in mavlink_bridge_header.h but lets me print the characters out to a debug terminal, and not just the binary data. (remove the DEBUG definition if you want to send binary)
Summary
MAVLink can be a bit hard to get your head around at the beginning, and I see there are a lot of posts on the internet with people struggeling with implementing it for the Arduino. Hopefully this will provide you with a basic working example that you can continue working on. This example now only has the HeartBeat message implemented, but once you get the basic plumbing together and understand the connections, it should not be to hard to expand the MAVLink message support.
Note:
On other examples found for Arduino you will have to include FastSerial.h. This was only necessary before Arduino 1.0 when the Serial.write operations where blocking. Now they are not, but you can use Serial.flush() if for some reason you need to wait on the outgoing data buffer to empty before moving on. NOT RECOMENDED
MAVLink is now implemnted as a static header only library, but if you want to integrate the receive functionality without a static class you are free to leave the definition in the .h file and implement the class somewhere else (Preferably mavlink_receive.cpp)
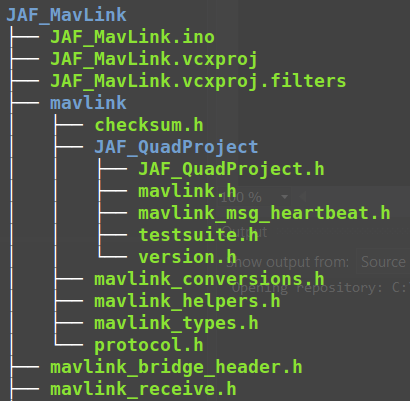
Here is a picture of the completed file structure after putting it all together. (I used VisualMicro to create this sketch)

For the complete code examples, see my ArduinoLibary GitHub page.

